



WordPress Posting Tool and How to Use Featured Images and Article Images
The WordPress posting tool takes care of the small jobs around every post that nobody enjoys: choosing a category, adding tags, preparing images, giving them sensible names and finally sending everything to the site in one go. The software described here is such a tool for your desktop. It is aimed at bloggers and site owners who want finished posts to appear complete, with image and details, rather than half done and waiting for a manual touch.

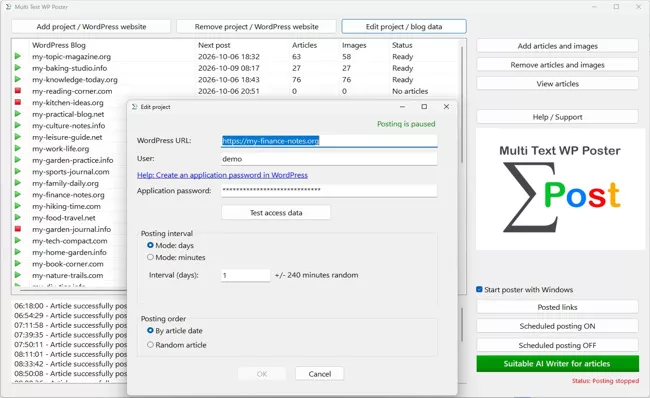
A post without an image looks bare in the overview, and a post with a badly named, far too large image slows the site down. Both happen constantly with manual work, because the image is the step you are most likely to skip when publishing. A good WordPress posting tool takes exactly that off your hands: it converts images, assigns file names, sets descriptive texts and builds the image in at a suitable spot. How this WordPress posting tool handles this in detail and what you should contribute yourself is shown in this article.
Two Image Roles with Featured Image and Image in the Article
With the WordPress posting tool, every article can get up to two images, and both have a fixed job. The featured image is the preview image. It appears in overviews, in your theme's post blocks and often when someone shares the post on social networks. In the program it is called "Featured image", and in the file name you recognize it by the ending _IMG1.
The image in the article sits in the middle of the text. It breaks up long passages and can show a motif that fits the content. It carries the ending _IMG2 and is called "Image in article" in the dialogs. Both images are optional. An article can appear without an image, with only one of the two or with both. If one is missing, the post simply goes online without it, and there is no error message.
The two roles of the WordPress posting tool can be filled independently of each other. If you only need a preview image because your theme provides no images in the text, assign only _IMG1. If, conversely, you like images in the text but need no preview image, assign only _IMG2. The project overview counts the images in the folder in a column of its own, so you can see at any time how many image files are still waiting for use.
Assigning Images by Hand, by File Name or at Random
This WordPress posting tool offers three kinds of assignment. The first runs through the file name: if an image is named like the article and ends in _IMG1 or _IMG2, the WordPress posting tool assigns it itself while reading in. The article 0012-WORDPRESSBLOG-balcony.html thus goes together with 0012-WORDPRESSBLOG-balcony_IMG1.jpg as its featured image. This pays off when a copywriter delivers text and images together.
The second kind is manual assignment in the import dialog. You select exactly one article, choose an image on the right and click "Assign featured image" or "Assign article image". If the article already has an image, the WordPress posting tool asks whether it should be replaced. With "Clear assignment" you take an assignment back.
The third kind is random assignment. The buttons "Featured image random" and "Article image random" distribute free images to articles that do not have one yet. This is the fastest solution if you have a folder of general motifs that fit many texts. If no free images are left or all articles already have one, the WordPress posting tool points that out. Be careful with very specific topics: a random image does not suit every text, and an unsuitable motif looks worse than none at all.
What the Program Does with the Image during Import
When adding to the project, the WordPress posting tool saves every image anew as a JPG at high quality. This also applies to PNG files: they are converted, and transparent areas then appear on a white background. Anyone who wanted to use transparent logos should know this, because they do not keep their transparency.
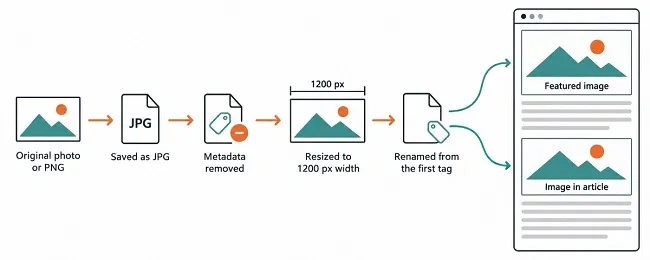
A useful side effect of the WordPress posting tool is the removal of additional data. Photos often contain hidden details such as camera type, capture time or even the location of the shot. When saving again, this metadata is not carried along. For published images that is a privacy advantage that is easily forgotten with manual work.
There is also a checkbox for shrinking: "Resize images to 1200 px". If it is ticked, wider images are reduced to a width of 1200 pixels. Smaller images stay unchanged; nothing is ever scaled up. For most blogs this is a good setting for this WordPress posting tool, because a photo straight from the camera, several thousand pixels wide, lengthens the loading time unnecessarily. In the project folder the files are afterwards named like the article, followed by _IMG1.jpg or _IMG2.jpg.
File Names on the Site Derived from the First Tag
An image called IMG_4837.jpg tells search engines and readers nothing. That is why the WordPress posting tool assigns a meaningful name on upload. The basis is the first tag from the TAGS section of the article. If it is missing, the WordPress posting tool takes the title, and if that is not usable either, the image is simply called "bild".
The file name is created from the tag by fixed rules: everything in lower case, umlauts written as ae, oe, ue and ss, spaces and underscores replaced by hyphens, special characters removed. After 80 characters it stops. The following table shows examples.
| First tag | File name on WordPress |
|---|---|
| Balcony planting | balcony-planting.jpg |
| Garten Töpfe | garten-toepfe.jpg |
| Große Blumen | grosse-blumen.jpg |
| (no tag, title "Herbs in winter") | herbs-in-winter.jpg |
If you have two images, the image in the article additionally gets a three-digit random number, such as balcony-planting-482.jpg, so that the two names do not collide. Your originals in the project folder remain unchanged; only a copy with the new name is uploaded each time.
Alt Text and Title from the Tags
The alt text describes an image for people who cannot see it and for search engines. Here too the WordPress posting tool draws on your tags. For the featured image, the first tag serves as the alt text. For the image in the article, alt text and title are formed from the whole tag list as it stands in the article, for example "Balcony planting, plants, summer".
A practical rule for choosing tags follows from that: the first one should name the image motif or the core topic briefly and accurately, because it also shapes the file name and the alt text of the preview image. And the list as a whole should stay short. Fifteen tags produce an alt text that looks more like a keyword cloud than a description. Three to five well-chosen terms are entirely sufficient.
If you want more control over individual alt texts after your WordPress posting tool has done its work, you can change them in the WordPress media library after publication. For most blogs the automatic solution is enough, because it delivers a solid basis without any effort, which you can refine if needed.
What Matters When Choosing Images
The best WordPress posting tool is of little use if the source material is weak. Choose images in landscape format, because they fit most layouts and are rarely cropped awkwardly in preview areas. Also pay attention to sufficient resolution: an image less than 1200 pixels wide quickly looks blurry on large screens, and the WordPress posting tool does not enlarge anything. A width of 1200 to 2000 pixels is a good starting point, because it can be reduced to the standard value with little loss.
The motif should fit the text and not merely decorate it. A photo that shows the content concretely appears more credible than an interchangeable symbolic image. Avoid images with embedded text, because it cannot be read as text, becomes illegible on small screens and is completely missing for search engines and screen readers.
And finally, rights: use only images you have made yourself or whose license expressly permits use on your site. Some licenses require attribution, which the WordPress posting tool does not set automatically. For third-party images, note the source and license, ideally in the file name of the originals or in a small list next to the stock, so that months later you still know where an image came from.
Where the WordPress Posting Tool Places the Image in the Text
The WordPress posting tool uploads the featured image and sets it as the preview image when creating the post. The image in the article is first uploaded separately. Afterwards the WordPress posting tool assembles the image section, with the address of the uploaded image, with alt text and title and with the actual width and height of the image. These size details help the browser reserve the space in the layout before loading, so the text does not jump when the image appears. The image is only loaded once the reader scrolls near it.
It is inserted roughly in the middle of the text, at a spot where the HTML code is not torn apart, for example between two paragraphs. You do not have to prepare anything in the article. A placeholder is not necessary either. If you want to control the position, look at the first post after posting and judge whether the spot suits the structure of your texts.
A note of caution: add images via the import dialog and not by hand into the project folder. Only there does the conversion to JPG take place. A PNG copied in by hand as the image in the article can fail at the size check when posting, because that check is designed for JPG. After posting, the WordPress posting tool marks article and images together with the prefix #-USED-#- so that an image is not used a second time.