



WordPress Article Poster and How to Import HTML, TXT and Word Files Safely
This WordPress article poster is, at its simplest, an importer and a publisher in one. You hand it files such as HTML, plain text or Word documents, and it checks them, converts them where needed and files them into a project. Later it posts them to your site, one at a time. For editors who receive articles from several writers, this means one consistent entry point for everything that is meant to go online, instead of a pile of attachments and manual copy and paste.

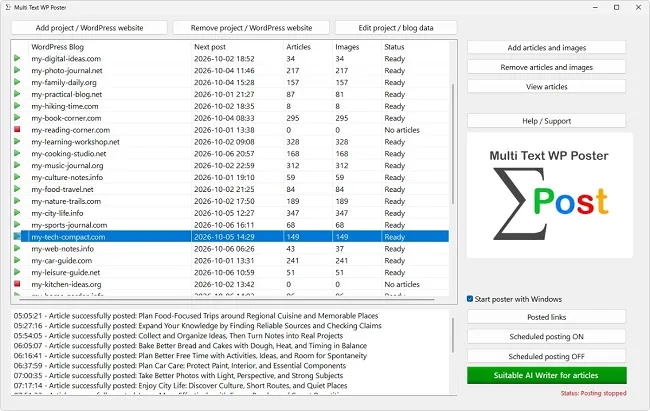
Before the WordPress article poster can publish anything, the texts first have to arrive in the project. That sounds like copying, but it is more: the WordPress article poster checks format and names, converts Word documents, prevents duplicate entries and lets you look everything over once more before it is adopted. If you know the procedure, you can load even large deliveries in a few minutes. This article walks through the import in Multi Text WP Poster from selecting files to the transfer into the project.
The Import Dialog at a Glance
You open the import of the WordPress article poster via "Add articles and images" after selecting the project you want. A window appears titled "Add articles and images" followed by the project name. On the left is the list of articles you want to add, on the right a preview of the images not yet used.
The article list has five columns: Article, Title, Category, Featured image and Image in article. In the first two you see file name and headline, in the other three what has already been assigned. Empty fields are not an error, because category and images are optional. Above the list you find the buttons for reading in files, below them the tools for categories and images, and at the very bottom "Add to project" and "Cancel".
Until you click "Add to project", nothing happens in the project folder, with one exception mentioned further below. Everything you read in, assign or change in the dialog remains provisional. If you cancel, the stock stays unchanged. That makes the dialog of the WordPress article poster a safe preparation room: you can experiment, discard assignments again and go through the list in peace. While it is open, scheduled posting is paused, and a note at the edge reminds you: "Posting is paused".
Three Ways to Read in Articles
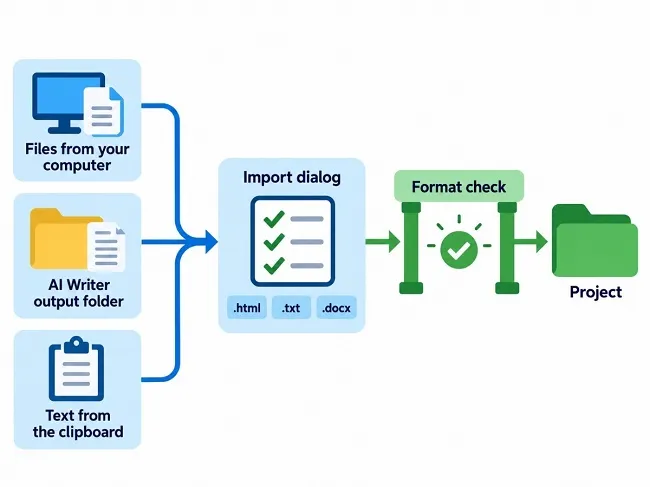
There are three buttons for choosing. "Import multiple articles and images" opens a file dialog in which you pick a folder and mark any number of files there. The buttons "Select all" and "Deselect all" are handy: with them you can choose a whole delivery at once or deselect individual texts. With "Use selected" the marked files land in the list. This route suits everything that exists as files on your computer and that your WordPress article poster should take in.
The second route is "Import article from AI Writer". If the AI Writer is installed, the button opens its output folder, and you pick the finished texts there. If the program is missing, the button leads to an information page instead. Anyone working with the AI Writer and the WordPress article poster saves searching the file system, because the folder is already preset.
The third route, "Add single article", is meant for text from the clipboard. How it works, including the automatic detection of title and headings, is the subject of a separate article. You only need to know one point: after an individual article pasted this way, the button "Post article now?" appears. It lets you publish exactly this text on the spot without changing the schedule. That belongs to the functions around immediate publishing.
File Types and Name Check
As articles, the WordPress article poster accepts files with the extensions .html, .htm, .txt and .docx. When reading in, it also pays attention to the name. The expected pattern has a four-digit number, the word WORDPRESSBLOG and a freely chosen name, for example 0012-WORDPRESSBLOG-balcony-planting.html. If the name does not fit, the notice "Invalid POSTFORMAT file name:" appears together with the expected pattern.
A second safeguard concerns files with the prefix #-USED-#-. They count as already published. If you try to read in such a file, the WordPress article poster reports that the article has already been used and does not accept it. That way no text enters the stock a second time, even if you copy from an old folder.
If a file with the same name already exists in the project, the WordPress article poster asks: "File already exists:" followed by "Overwrite?" You decide with Yes, No or Cancel how to proceed. With large deliveries it is worth not clicking this message away but briefly checking whether the new version is really the better one. For new texts, assign consecutive numbers instead, and name conflicts do not arise in the first place.
Word Files and How a Document Becomes an Article
The WordPress article poster converts Word documents in .docx format to HTML when reading them in. For this it uses a helper program that has to sit in the program folder. If it is missing, or if the conversion takes longer than 90 seconds, an error message appears and the article is not added.
After the conversion, the WordPress article poster brings the file into the article format. Lines such as [TITLE], [TAGS], [URL], [META-TITLE], [META-DESCRIPTION] or [TEXT] are recognized even if you set spaces inside the brackets in Word, and are rewritten into the correct form. So you may write the details directly into the document, each on its own line.
There is a simpler way if you do not want to use any markers at all. If the document begins with a first-level heading, the WordPress article poster makes it the title and the rest the text. So format the first line in Word with the "Heading 1" style, and set all further subheadings one level lower. Then you need no markers and still get a clean result. The original document remains untouched, because the WordPress article poster works with a copy.
The Format Check and What the Import Rejects
Every article is checked before it is accepted. The WordPress article poster checks whether the sections for title and text exist and whether both contain something. If a marker is missing or a section is empty, "Invalid POSTFORMAT:" appears with a list of what is missing or wrong, for example "TITLE is empty" or "TEXT marker is missing".
Such a text does not get into the list. You see immediately which file is affected and can correct it in the editor. Tags, category and meta details, by contrast, are not checked, because they are optional. This ensures that later, when posting, no article without a title or text runs into an error message.
The advantage of this early check in this WordPress article poster becomes clear with large deliveries. Instead of a defective text only being noticed weeks later in the automaton when its turn comes, you see the problem at the moment of reading in, while the error picture is still fresh. Collect conspicuous files in a side folder, fix the errors in one go and read them in again afterwards.
Checking and Completing the List
After reading in, you see all texts with file name and title. Check the titles by sampling. A title taken from the wrong paragraph stands out immediately at this point. If needed, you can now load categories and assign them to the marked articles; the "Load categories" button with the selection list serves this purpose. How exactly this works is explained separately.
Images can also be assigned here in the WordPress article poster. The "Import images only" button brings images into the preview on the right. If the images carry the ending _IMG1 or _IMG2 in the file name, the WordPress article poster assigns them automatically to the article with the same base name. All others land as free images in the preview and can be assigned by hand or at random. This topic, too, is covered by a separate article.
Use the list of your WordPress article poster as a checkpoint. What you notice here, you correct with two clicks. What you only notice after the transfer costs more effort, because you then have to touch files in the project folder. A look at the Category and image columns also shows at a glance whether an assignment was forgotten.
Transferring the Import with the WordPress Article Poster
With "Add to project" you start the actual transfer. The WordPress article poster first asks whether the articles should be imported with these settings. If you confirm, it copies the articles and images into the project folder. Word documents lie there as finished HTML files in the article format. A category value that has been set is written into the file so that it is available when posting.
The original modification date of the files is preserved in the process. This matters if you have chosen the order "By article date", because then this date decides which text appears first. Anyone who wants to control the order in the WordPress article poster therefore sorts their delivery before the import.
At the end the WordPress article poster reports how many articles were added to the project. The project overview then updates the numbers for articles and images. For larger deliveries the following sequence has proved its worth:
- Select the project in the overview and open the dialog.
- Read in articles and watch for error messages.
- Check titles in the list by sampling.
- Assign categories and images.
- Confirm the transfer and compare the number in the message with the expected quantity.
If the number does not match, you know at once that a text got stuck on its way into the WordPress article poster and can investigate specifically.