



Automatically Post WordPress Posts and Keep the Overview with Status, Log and Link List
To automatically post WordPress posts is one thing, to know what has been posted is another. The tool covers both sides. It publishes your articles on schedule, and it shows you what it is doing through a status line, a running log and a list of every published link. It suits site owners who like automation but want to stay in control, and who need a simple way to show clients or colleagues what went live and when.

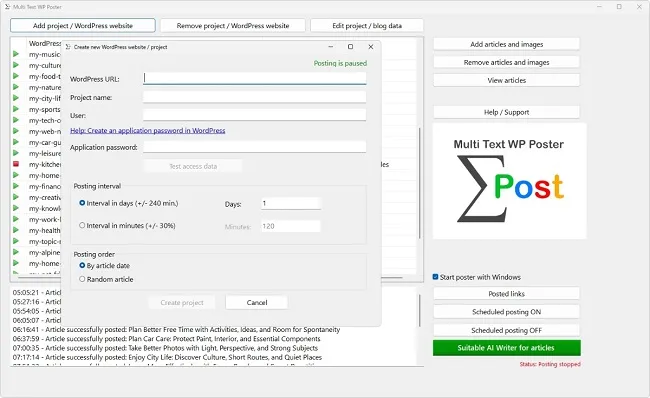
When you automatically post WordPress posts, a setup that works reliably tempts you to look away. That is convenient and risky at the same time, because small disruptions stay undiscovered until large gaps have appeared. An empty folder, an expired password or a mistake in the format only becomes noticeable when nothing has appeared for weeks. The good news: controlling how you automatically post WordPress posts takes hardly any time once you know where to look. This article shows the displays the program offers when you automatically post WordPress posts and how to use them sensibly.
The Status Line Shows Whether the Automaton Is Running
In the main window there is a status line above the project list. It answers the most important question first: is the automaton working or not? "Status: Posting active" means the timed control is active. "Status: Posting stopped" means it has been switched off, for example via the "Scheduled posting OFF" button. As long as this state applies, nothing appears, no matter how many dates pass.
Two further states are temporary when you automatically post WordPress posts. "Status: Paused (editing)" appears while you have an editing window open, such as an import or the project settings. As soon as you close it, operation continues. If the program starts together with the computer, you first see the notice about the eight-minute wait before posting begins.
A frequent case among those who automatically post WordPress posts is that someone switches off the automaton to sort texts in peace and forgets to switch it on again. The status line reveals that immediately. Take a look at it after every bit of work in the program. It costs a second and protects you from an unintended pause that otherwise only makes itself felt days later, when readers or clients ask.
The Project List as an Early Warning System
If you automatically post WordPress posts to several sites, the project list below the status line shows four details per site that together give a good picture: the blog, the next post, the number of articles and images, and a status. The number of articles is your early warning system. If it drops below the need of the coming weeks, it is time for restocking. If it says zero, the status reports "No articles", and nothing happens until the next delivery.
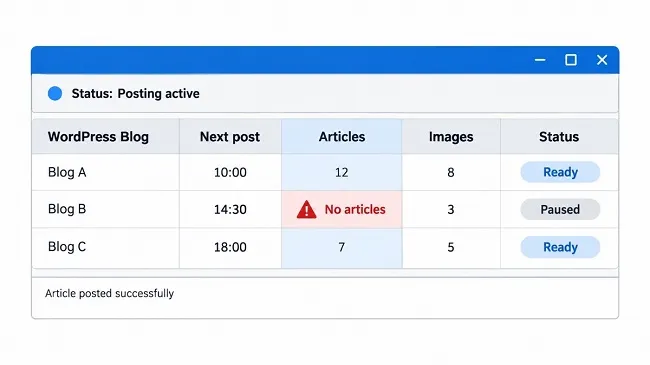
The "Next post" column shows when the next post is due. If the date lies plausibly in the future, everything is fine. A date that passed long ago even though articles exist and the automaton is running points to a problem, for example wrong credentials or a site that cannot be reached. Causes and remedies for such cases are covered in a separate article on troubleshooting.
The list updates after every time you automatically post WordPress posts. Even if you put files into the folder by hand or remove them, the program reconciles the numbers at the next due date. If the numbers do not add up once, restarting the program helps, but usually it is enough to wait for the next run. Anyone who wants to automatically post WordPress posts for several projects sorts the list mentally by urgency: first the sites with the fewest articles, then those with the oldest dates.
The Log Field and What the Automaton Reports
When you automatically post WordPress posts, a log runs along in the lower area of the main window. Every successful post produces a line with the article's title, for example "Article posted successfully: Balcony planting". When there are problems, an error message with the reason appears there, such as a missing title, a site that does not respond or credentials that are wrong. Notes on the SEO details end up in this place too.
When you automatically post WordPress posts, the program deliberately keeps the log quiet. An empty folder is not worth an error message and does not appear there. If the same error persists, it is not output again at every attempt but only when the state changes. That keeps the field readable, and a single entry does not get lost in a flood of repetitions. After a successful run, an earlier error status counts as cleared again.
If you automatically post WordPress posts, ideally read the log in a fixed routine, say once a week. Watch for lines that do not sound like success, and for gaps: if you see no success message for three days even though posts would have been due, it is worth looking into the cause. The log is a working field for ongoing operation and not an archive. For permanent storage when you automatically post WordPress posts, the link list is intended.
The List of Posted Links
Every time you automatically post WordPress posts successfully, the post is additionally recorded in a central list. You open it via the "Posted links" button. In four columns you see date and time, the project, the title and the address of the published post. The list brings all your blogs together and is thus the best proof of what appeared when and where.
With "Start link" you open the selected post in the browser, so you can check the result on the site immediately. If you have not selected an entry, the program first asks you to choose one: "Please select a link first." "Refresh" reads the list in again, and "Open file with links" opens the underlying text file. In it the details are stored line by line, separated by tabs, so you can easily transfer them to a spreadsheet.
That is particularly useful for agencies that automatically post WordPress posts for clients. If you have to report to clients regularly, you export the list, filter by project and have the proof ready in a few minutes. But it is worthwhile for your own needs as well: you can check whether the intervals match your setting, and find posts again later when you want to revise them. Because the list is stored centrally, it is kept even if a project is removed later.
Spot Checks When You Automatically Post WordPress Posts
When you automatically post WordPress posts, the best logs do not replace a look at the result. Regularly open individual posts via the link list and check whether everything looks as you expect. Pay attention to four things: is the title right? Are headings and lists displayed correctly? Does the image sit in a sensible place? And is the category the right one?
Also view the post once on your phone. A large share of your readers probably comes via a smartphone, and tables or images that look good on the desktop can fall out of the frame there. Whatever you notice, correct immediately in the stock so that the next posts do not have the same flaw.
With the first posts of a new project, when you automatically post WordPress posts, a thorough check is worthwhile, later spot checks are enough. One or two posts per week and project give a good feel for the quality of the whole without costing much time. If you automatically post WordPress posts to several sites, rotate the selection so that no site stays permanently unobserved.
Cleaning Up by Removing Articles and Images
Not every text lying in the stock is meant to appear when you automatically post WordPress posts. For cleaning up there is "Remove articles and images". The dialog shows per article the file name, the title, the category and whether a featured image and an image in the article are assigned. You mark the entries you want and choose from three options: "Delete selected articles", "Delete featured image" or "Delete article image".
Keep in mind, when you automatically post WordPress posts, that deleting is final. The program does ask for confirmation, but it does not move the files to a recycle bin. Anyone who removes an article also loses its assigned images. Therefore save texts you may still need somewhere else before you delete them here. The function affects only the stock. Posts already published on the site remain untouched.
If an image is unsuitable but the text is fine, remove only the image and assign a new one in the import dialog. That way the article keeps its position in the stock, and you save yourself reading it in again. After cleaning up, the project list updates its numbers.
When a Published Post Has Errors
When you automatically post WordPress posts, the program does not change published posts afterwards. If you discover a mistake, correct it in the WordPress backend, as with any other post. More important is the second question: does the same error also sit in the articles that are still in the stock? If it stems from a faulty prompt or a faulty template, that is very likely.
In this case, switch off the automaton with "Scheduled posting OFF", fix the error across the whole stock and switch it on again afterwards. This detour is much cheaper than repairing every further post afterwards in the backend. Document the cause briefly so that it does not occur again with the next delivery.
If the error affects only a single text, such as a wrong link or transposed digits, correcting it in the backend is enough. For that, open the address from the link list, which saves searching in the post overview. If you rebuild headings or lists while doing so, look at the preview afterwards, because the backend does not always show formatting the way it later appears on the site. If a post has gone so wrong that it belongs offline, set it back to draft in the backend instead of deleting it. That way the address stays reserved, and you can release it again later after revision.